|
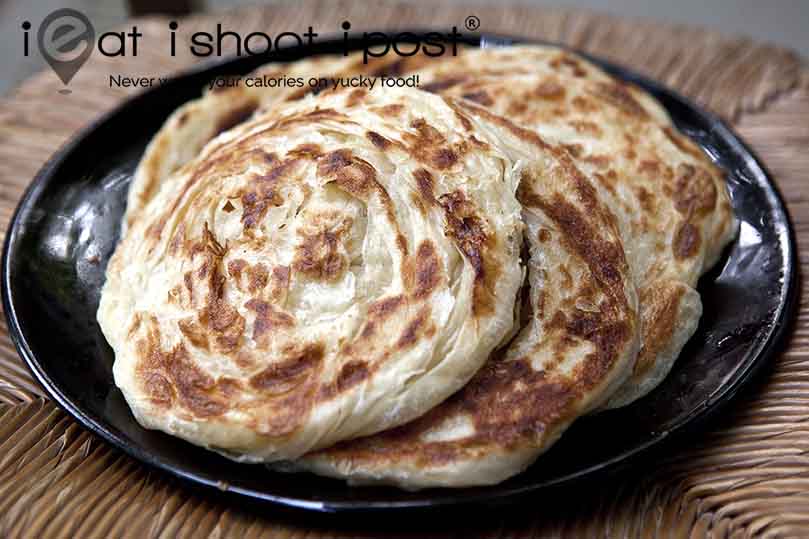
How time flies! It’s been 10 years since I posted this recipe for roti prata! So, for this 10th anniversary, I have shot another video on how to make Roti Prata! Many people have used the recipe and have written back with photos of their success! Most are people living overseas where it is not possible to simple head down to the prata shop to satisfy that craving. During this Covid 19 period, this is a great recipe to master so that you can have crispy and fresh prata for the whole family! Once you have mastered plain prata, you can start to fill it with other ingredients such as cheese, luncheon meat, roast duck, BBQ chicken, etc etc! Have fun! First published on 23 Jun 2010 The reason I am writing this post is because I cannot find a single resource on the internet that gives you everything you need to know in order to create Roti Prata/Canai. In order to make a Roti Prata that is as good, or even better than those you find outside you really need to know all the details, from what kind of flour to use, to how to prepare the dough, to how to flip the dough just like your favourite Prata Man. What’s in this PostThis post is necessarily long because I want to include everything which I have learnt over the course of the last month or so from talking to Prata Men, studying Prata flipping videos and even to the extent of discussing the characteristics of flour with the expert at Prima Flour Mills. I have included a few recipes plus a slideshow on how to make the dough and 2 videos where I demonstrate, step by step, the dynamics of the Prata flip as well as another method to achieve the same Roti Prata which even a 5 year old can do. I hope that by reading this post, you will be making Pratas at home in no time and wowing your friends with your Prata Prowess.
The Roti Prata Back StoryBut before we get into the nitty gritty details, let’s talk about Roti Prata. I spoke to a patient of mine a while ago who happened to be from South India about Roti Prata. Many people have previously told me that the dish we Singaporeans call Roti Prata, (aka in Malaysia as Roti Canai) does not exist in India. My patient confirmed that it is not true. Roti Prata does exist in India, but only in a small part of Southern India and predominantly in a place called Chennai. Over there, this dish is simply called Prata. Indian migrants brought this dish to Malaya where it became known as Roti Prata. The Malaysians however, named this dish Roti Canai which means the “Roti” (bread) from Chennai.* If you still doubt that this dish is available in India, consider this: Most of the men who make the Prata in Singapore are foreign workers from Southern India. Do you really think that we brought them over to teach them how to make Prata? It’s like bringing the Chinese over and trying to teach them how to play Ping Pong right? Anyway, Roti Pratas are a favourite breakfast dish amongst Singaporeans but there is a certain level of mystique about it because of the process of flipping the dough such that not many people would even attempt to do at home. Why would you want to make it at home if it is so readily available and is relatively cheap? Well, I can think of three reasons. Why make Roti Prata at home?1. Most of the Pratas you eat at the stalls will contain high levels of Trans Fats since they are made with cheap margarine and they usually contain more oil than is necessary. When you make Prata at home, you can choose to use Olive Oil and limit the amount of oil used. 2. When you can make your own Prata, you can then add ingredients which you will never find outside, like say, Luncheon Meat, Egg and Onion Murtabak (filled prata) which is really very tasty. Then you can organize parties and get your friends to bring toppings and design their own Murtabak! 3. Because nobody believes you can. 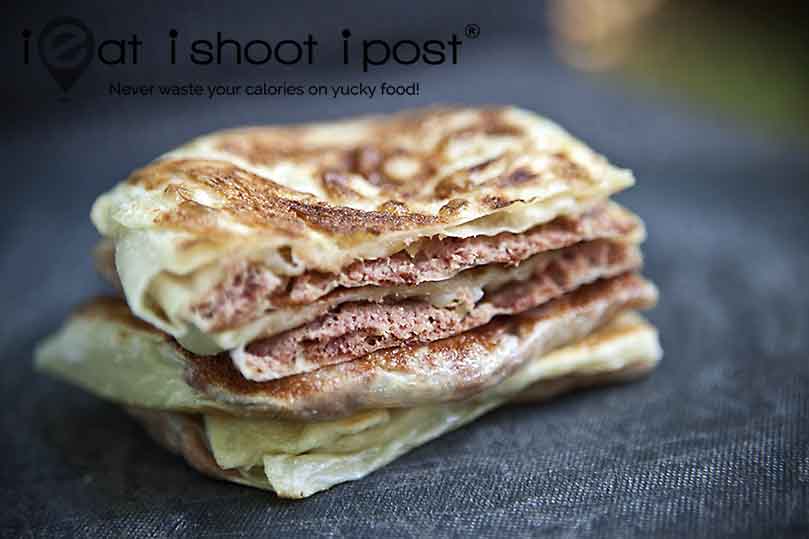
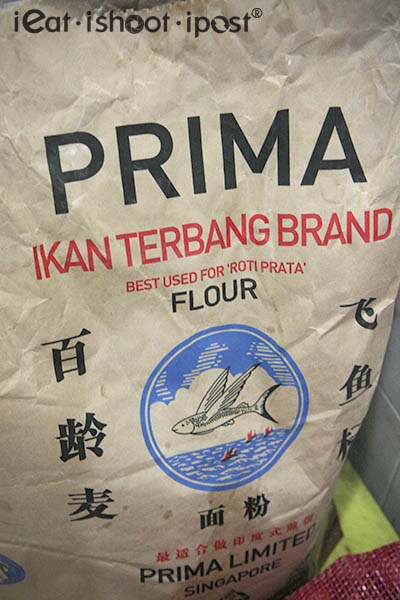
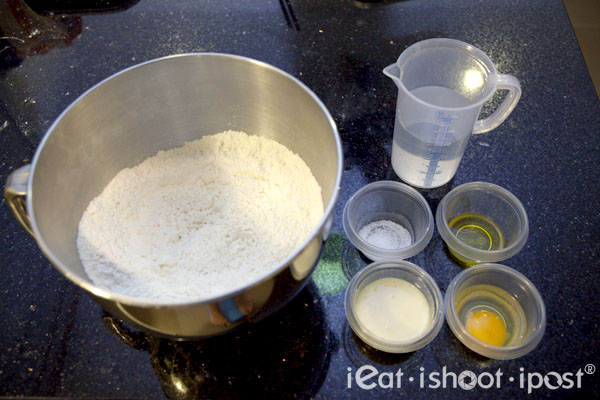
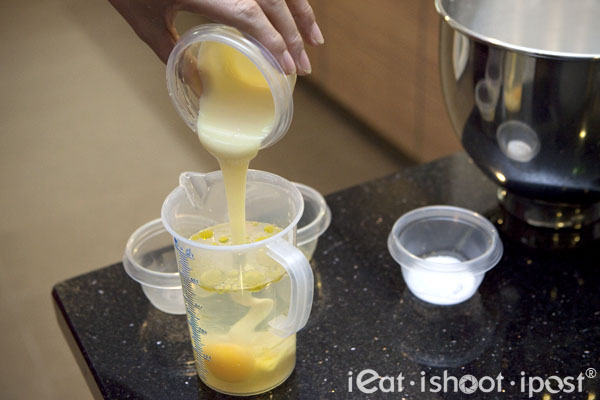
Roti Prata RecipeIngredients1. Plain Flour 600g Leaner Prata Dough Recipe (Crispier texture)1. Plain Flour 600g Notes on ingredients:Flour But you don’t have to do that because I finally managed to talk to the flour expert at Prima Flour Mills who told me that Ikan Terbang is simply plain flour with a 10.8% protein content. Furthermore, you can buy the exact same flour at your supermarket as it is sold in 1kg packs labeled “Plain Flour” by Primaflour. So where ever you are in the world, if you can get your hands on plain flour with a protein level of 10.8%, it would work perfectly. NB: Water Condensed Milk Oil/Butter/Ghee Salt Egg Making the Dough
This is by far the most important part of the whole Prata production process. If you have a good dough and bad flipping technique, you can still end up with a good Prata. However, if your dough is bad, there is no way you will ever get a good Prata.
In order to make a dough that is pliable and elastic, you need to remember just one crucial point. Be patient with your dough! What dough needs more than anything else is time. Dough is like a bad tempered friend. If you want to get through to him, you have to use a soft approach. The more you fight it, the more it will retaliate. Let it cool down for a while and deal with it gently and it will do whatever you want. 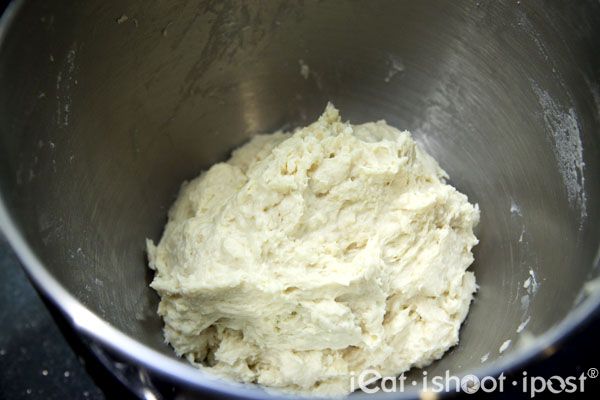
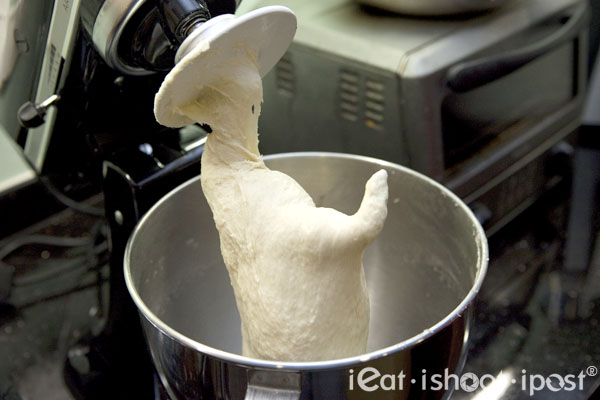
There is a lot of waiting involved. The first wait is after you mix the flour and water. Once both water and flour is mixed evenly, leave it alone for 20 minutes for them to get to know each other intimately. This stage is known technically as the autolysis stage. If you continue to force it to combine together, you are just wasting your time and energy. Give it 20 minutes and when you start to knead, you will get a smooth dough in no time.
For this dough, you really do need to develop the gluten a bit. So I usually knead it at speed 2 on my KitchenAid (Medium slow) for 10 minutes with a 5 minute rest time in between. If you want it to be even more elastic, repeat the 5 minute knead and rest cycle one more time. If you are kneading by hand, you will need to double the kneading time. What you want to end up with is a tacky dough which becomes smooth as a baby’s bottom with just a bit of dusting of flour.
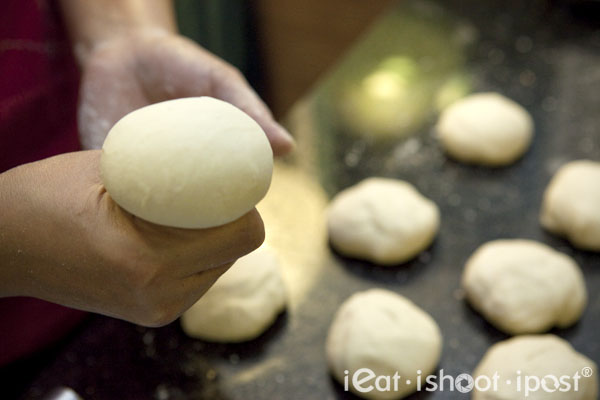
Right after kneading, divide the dough into equal parts. I usually divide mine into ten 100g dough balls (approx). At one time, I used to oil my hands and ball it like how I see the Prata Men do it but I realized that the oil makes it difficult for the flour to combine at the folds. What you really want is a smooth ball of dough without any folds because these folds will cause fractures in your dough during the flipping process. So now I divide my dough and make them into nice balls before I oil them.
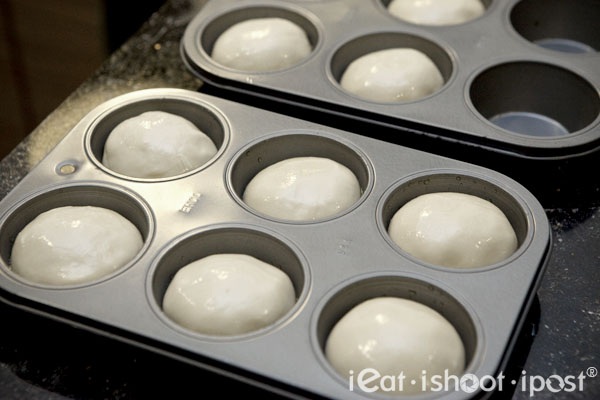
Once you oil the balls, you can do what they do outside and put them altogether in a box. But I find it easier to use non-stick muffin trays as I can minimize the amount of oil used and when I remove them, they come out as nice round ice hockey like pucks which is easy to flatten into round discs for flipping. You should try to rest them for at least 8 hours or overnight, because during this time, the enzymes in the flour will start working on the sugars and some of the wild yeast in the air will start fermenting the dough. The resting makes the dough more pliable and easy to flip as well as give it a more complex flavour. Remember to cover the dough balls with clingwrap to keep the surface from drying out. If you are in a hurry, you can flip the dough in as little as 50 mins after balling. (I guess it could be shorter, I just haven’t tried it yet) It still works, but you might find it breaks a little easier. Note: When they make these balls outside, they coat them with margarine which hardens at room temperature. So they are able to stack them into a box, saving space. By using a muffin tray, you can avoid using margarine and apply just a thin layer of vegetable oil which is much healthier for the family. ieat’s Express Prata Dough Recipe using the Food ProcessorSometimes you might just want to dish out your prata on the spot. I found that you can do this in an hour and fifteen minutes if you use a Food Processor. Basically, all the ingredients go into the Food Processor with the dough blade attached. Blend for 20 seconds until all the flour and water are mixed and the dough looks like a shaggy mass. Next, rest the dough for 20 mins then turn on the processor for 30 seconds followed by 2 min rest and another 30 seconds. The rest in between prevents your processor from overheating and allows the dough to rest so that it is easier to process. Divide and rest the dough for 50 mins and you are ready to go! The important part of this process is the rest time after balling the dough. The longer you rest the dough the better. I find that by 50 mins dough is extensible enough to be flipped. However, if you can rest the dough longer, you will find that it becomes even more pliable but the improvement might only be 10 to 20%. If you leave your dough overnight, you allow fermentation to take place and your dough will have time to develop a full bodied flavour. 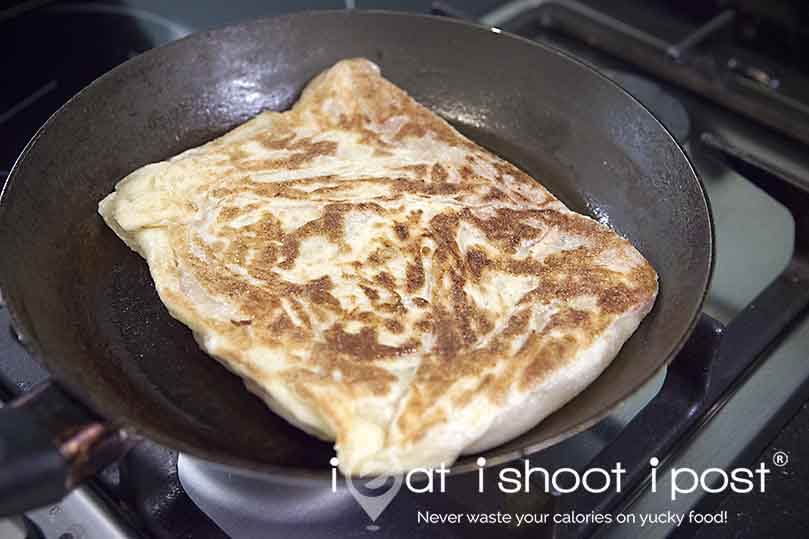
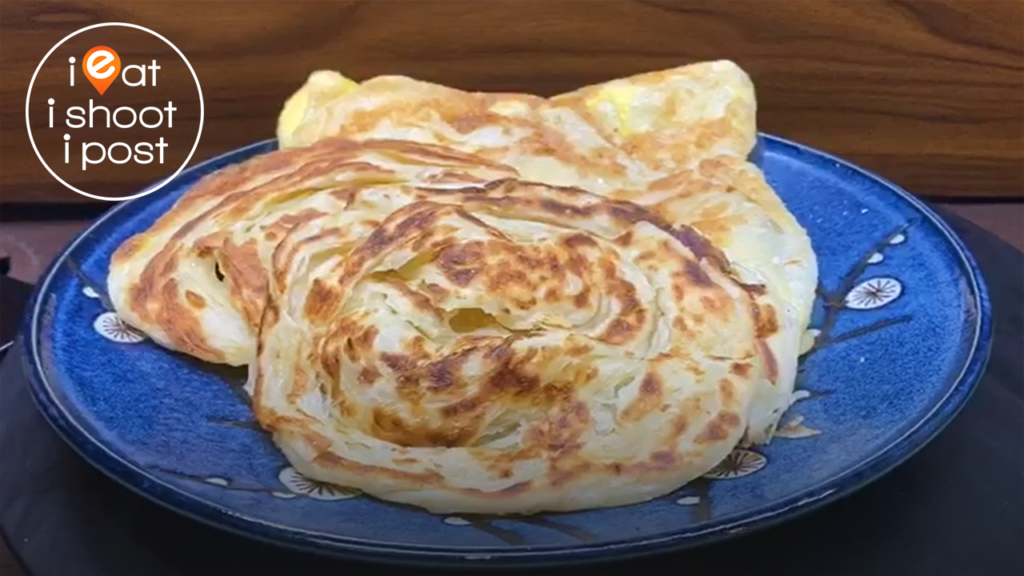
This is the fun part but is also the hardest to master if you want to be able to look like a Pro. (To really look like a Pro, you need hairy arms and a dark complexion, this I cannot help you with) I have actually tried to learn the technique from several Prata Men in the past and they have given me a few pointers here and there. But most of the time they just tell me that it would take me 3 months to pick up the skill if I practice everyday. As with most things, if you don’t understand the fundamentals of what you are doing and are just doing it blindly, it would take a long time. However, I have studied the videos on youtube over and over again and I eventually managed to conceptualize what is actually happening during the flipping process. With this basic understanding, I managed to master the skill within two weeks. (I must have flapped hundreds of balls though). In the video, I will show you the concept of the prata flip using a round disc, then you can see how it is done with a towel and eventually a piece of dough. I believe that if you study it well, you will be flipping Pratas in no time. For those who are not so patient and don’t have a need to show off to their friends, I have made a second video where you can achieve the same membrane thin stretched dough using a method even my primary school daughter can do. Don’t be intimidated by the prata flip, just concentrate on making a good dough and I guarantee you that you will get to eat crispy, fluffy and healthier Pratas at home in no time.
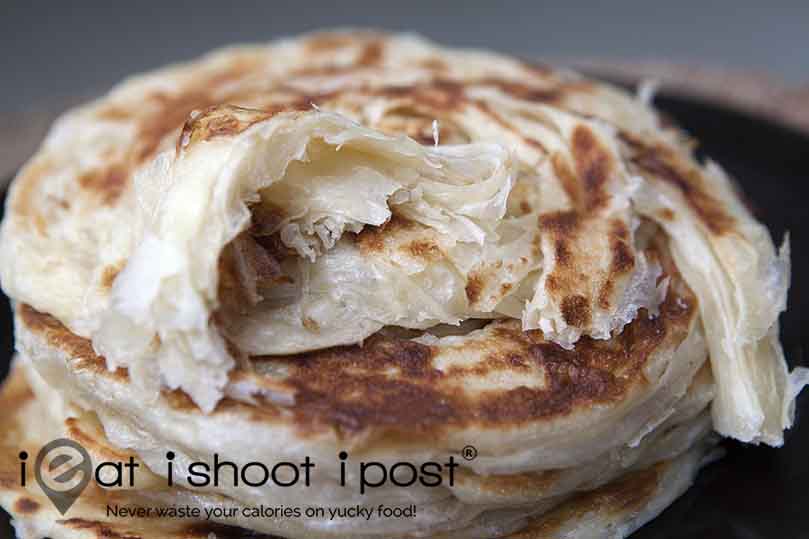
Ieat’s Drive for the Perfect Prata RecipeI have been thinking hard about how to achieve a crispier prata without having to add more oil to the dough and have came up with a method that works pretty well. The only drawback is that you really have to time the whole process properly. As far as I know, no one else has published a recipe like this online so I think this should be an ieat original recipe. What we need to do for a crispy crust and a fluffier inside is to introduce little air bubbles into the dough. You can do this by adding yeast or baking soda. I chose to use yeast because it gives you better control of the levening process. If you are after a Prata that will adequately portray your potent personal Prata prowess, I will use either Ghee or French Butter in place of oil and I also add 1/16 tsp of yeast (a pinch only) into the flour when I mix all the ingredients together. Once you ball the dough and oil it, place it immediately into the fridge to rest for 8 hours. By putting the dough in the fridge you slow down the levening process but you are still giving the dough time to rest and combine properly. About an hour and a half before you decide to flip you prata, bring it out of the fridge and rest at room temperature. The yeast will now slowly wake up and produce little bubbles of carbon dioxide in the dough. If it is rested beyond 2 hours, you will end up with bread, so timing is important. Just a slight 10% rise is enough to bring your Prata to the next level! You will find with this dough that your stretch membrane will not be less transparent as the normal dough without yeast and is a little less resilient. But the texture of the final Prata is crisp on the outside and light and fluffy on the inside and is especially good if you are planning to do Murtrabak as the layers inside will all be tender and fluffy. ConclusionOnce you have mastered how to make Prata, it is time to organize a Prata Party where you can invite your friends over to create new Murtabak (filled pratas) flavours! Some of the ones that worked really well for me were beef burger and cheese, parmesan and sugar, Luncheon Meat, Egg and Onions and Cornbeef, Egg and Onions.You can really go crazy thinking of all the wonderful flavours that you can put into your Prata! 
Daddy flipping Prata: Photo by Megan Tay 7 yrs old AcknowledgementsMany thanks to Mr Lim Kay Kong, the Director of Research and Development at Prima Flour Mills who was instrumental in helping me finalize the Prata recipe. Thanks also to Soundman for helping to produce the Prata Flipping Instructional Video. My Pandan Chiffon Cake and Tau Huay recipes can be found here Please do write in and let me know how you went with your prata. I would especially like to know if you were able to make yours even better! Update: 15 Sep 2010 After playing with the recipe for a few months, I have slowly lowered the water content. In the past, I used a 60% hydration, ie 600g flour to 360g water, I found that a 50% hydration is actually easier to handle. So I have modified the recipe by decreasing the water. * Footnote: After the writing of this blog post, one of our readers wrote in with reference to an article from the wsj that states that the origins of the word Canai is most probably attributed to the Malay word “to stretch” rather than its place of origin. You can click here to read the article. The post How to Make Roti Prata aka Roti Canai: Everything you need to know! appeared first on TinySG. via TinySG https://tinysg.com/how-to-make-roti-prata-aka-roti-canai-everything-you-need-to-know-2/?utm_source=rss&utm_medium=rss&utm_campaign=how-to-make-roti-prata-aka-roti-canai-everything-you-need-to-know-2
0 Comments
Leave a Reply. |
 RSS Feed
